Take Simple Steps to Uninstall Windscribe for Mac

Windscribe is a virtual private network service that claims to change your IP address as well as block ads and trackers. This app requires Mac OS X 10.8 or later, and the free plan offers 3G of of bandwidth per month. Yet if you are not so satisfied with its performance, you can easily uninstall Windscribe by adopting the proper steps.

In this post we are gonna show you two ways of uninstalling unneeded apps like Windscribe, and there are some tips you should know about app removal on Mac.
Quit Windscribe totally before uninstalling it…
If Windscribe is currently active, you are supposed to terminate this app as well as its process. You have 3 options to turn off the app and quit associated process:
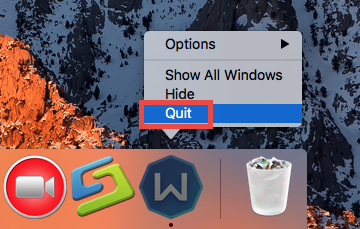
(1) Right click Windscribe icon in the Dock and choose Quit;
(2) Head to Windscribe in the Menu Bar and choose Quit Windscribe ;
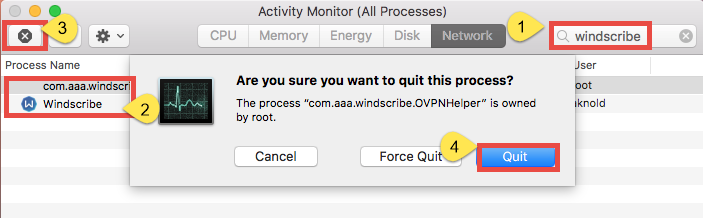
(3) Launch Activity Monitor from Spotlight, select Windscribe under Process Name, click X icon in the upper left corner, and click (Force) Quit button. Then repeat the steps to terminate the process which contains the word Windscribe.
After that you can begin the uninstallation, and there are two methods available here.
Solution 1: Remove Windscribe within Clicks (Osx Uninstaller)
Looking for an one-stop solution to get rid of apps as well as hidden leftovers? Wanna save some trouble in removing Windscribe for Mac? A dedicated, reputable uninstall tool may be what you need. Among so many uninstall utilities for Mac, Osx Uninstaller stands out with intuitive interface, streamlined process and clean uninstall result. This tool is capable of locating all components of target app and deleting them within clicks. Here is how you can easily uninstall Windscribe by Osx Uninstaller:
- Step 1. Download Osx Uninstaller, install and open it up via Launchpad.
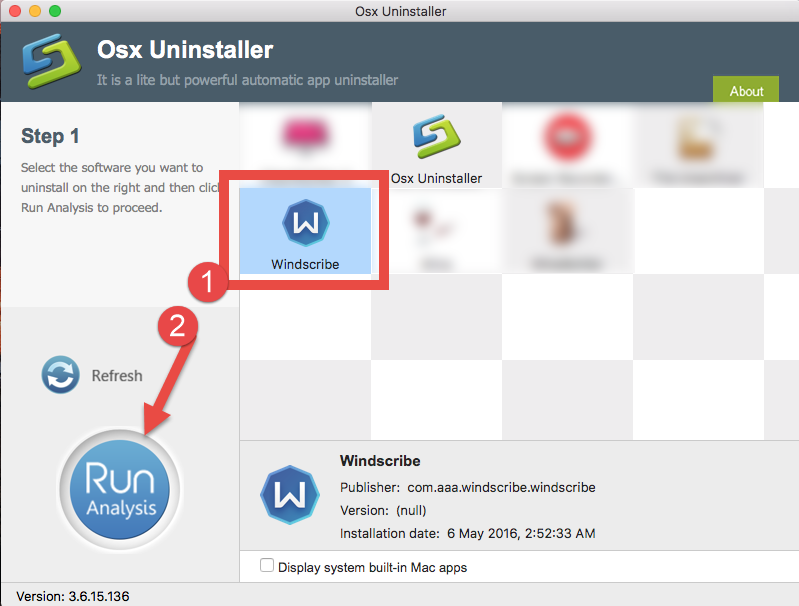
- Step 2. Select Windscribe icon that appears, and click Run Analysis.
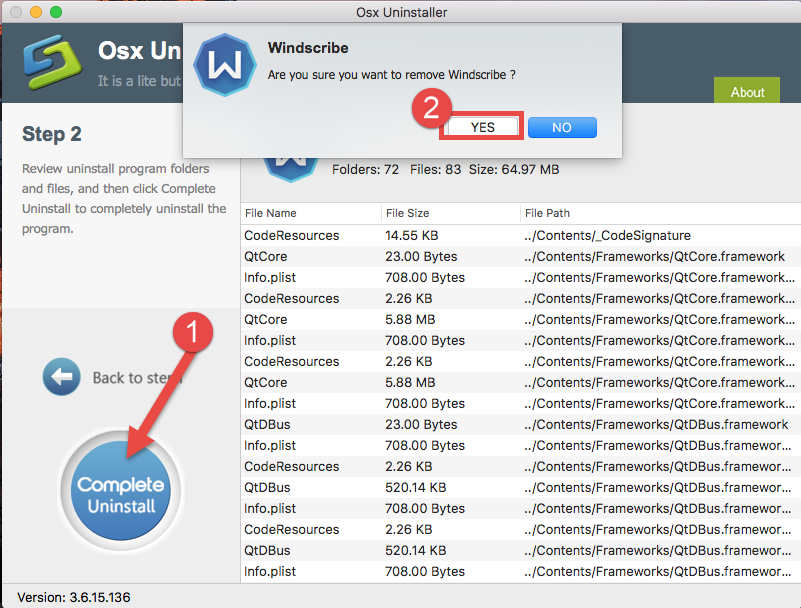
- Step 3. Click Complete Uninstall, and then click Yes to start the deletion.
- Step 4. Click Back to Interface to re-scan your Mac for currently installed apps.
How to Quickly Uninstall Windscribe in Seconds
As you can see, the uninstall process could take a few seconds to complete, and every trace of Windscribe will be instantly cleared from your Mac. This app is a no-brainer that allows you to remove problematic, stubborn or malicious software with no effort.
Solution 2: Uninstall Windscribe by Trashing It
For those who want to uninstall Windscribe without 3rd party tool, we also cover the conventional means to show you how to uninstall an app itself. Here are the details.
- Launch the Finder and click Applications on the sidebar to access to the folder.
- Search for Windscribe, then (1) drag it into the Trash in Dock and drop it there.
- If prompted, enter the current admin account password to allow this change.
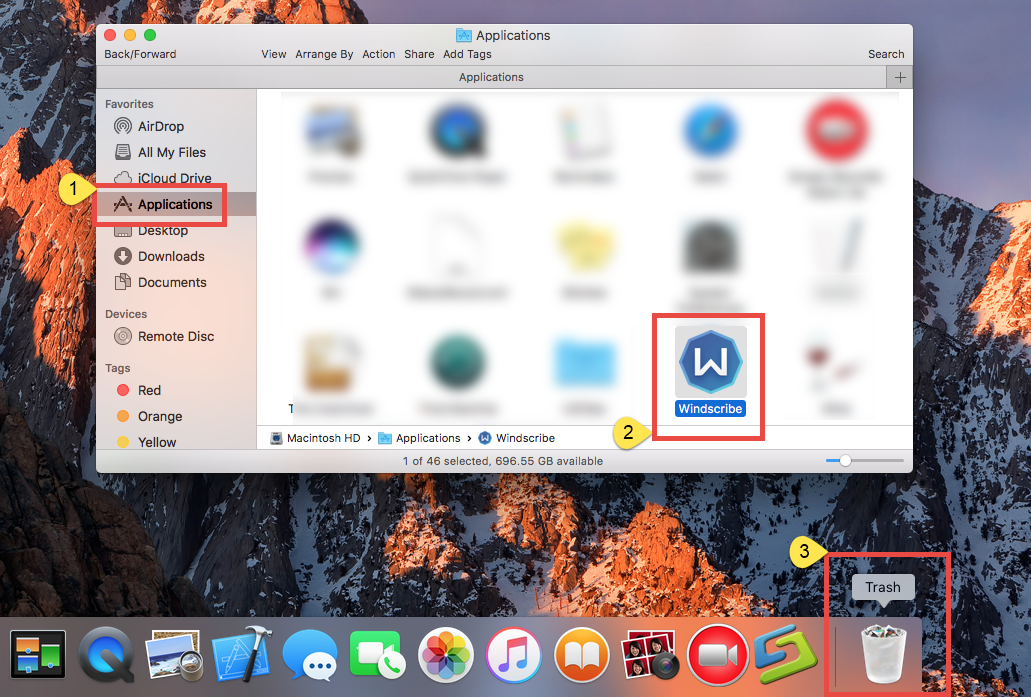
You can move the app to the Trash by the alternative steps: (2) right click on the app and choose Move to Trash option; (3) select the app, and go to File > Move to Trash. The trash-to-delete method works for almost all apps in all versions of Mac OS X.
Now the app has gone from the /Applications folder, and you can execute the uninstall by permanently deleting the app in the Trash. So continue with the two steps below:
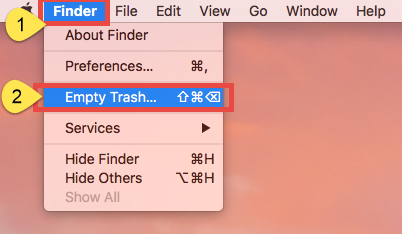
- Right click the Trash icon in dock, choose Empty Trash, and click Empty Trash again in the pop-up dialog. Alternatively, choose Empty Trash under the Finder menu.
- In any case you cannot empty the Trash, reboot your Mac and try it again.
Warning: The act of emptying the Trash is irrevocable, and everything dropped in the Trash will be deleted instantly and permanently. So before you empty the Trash, make sure you haven’t mistakenly thrown anything useful into the Trash.
Don’t forget to search for Windscribe leftovers…
Incomplete uninstallation is one of the biggest issues that upset most Mac users. If you adopt the first method (removing Windscribe via Osx Uninstaller), you can skip this part. But if you just trash Windscribe from the /Applications folder, you are suggested to do some extra work: deleting Windscribe leftovers hidden on the system.
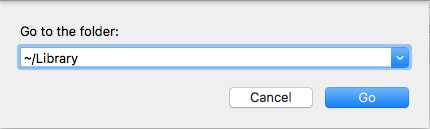
- Open up Finder, click the Go from the Menu Bar, choose the entry: |Go to Folder.
- Enter the following path: ~/Library and hit Enter key to open up the folder.
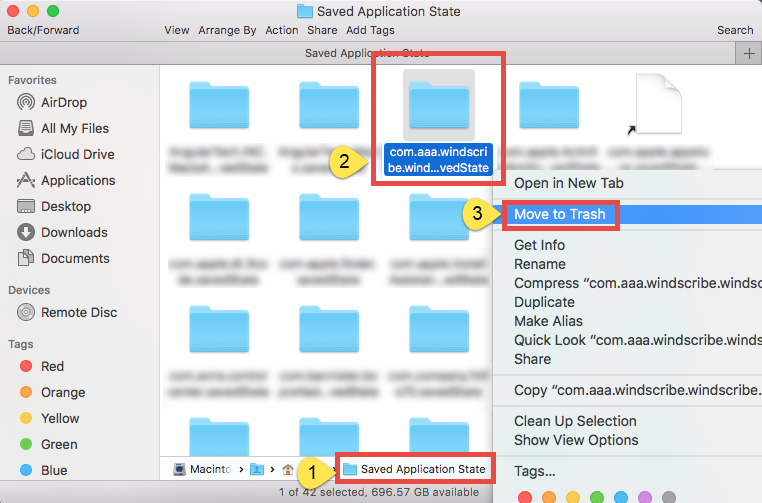
- Type Windscribe in the search box, and click the Library in the Search: bar.
- Identify the matched items, right click on them and choose Move to Trash.
- Repeat the steps to detect and delete component in the ~Library folder (if any).
- Empty the Trash again to permanently get rid of those junk files and folders.
Warming: novice users should be very cautious when manually deleting app vestiges in the /Library and ~/Library directories. If other app components or system files are deleted mistakenly, those affected app or even the system could not work normally.
Finally we come to the end of the manual removal tutorial. If you read carefully, by far you should have learned the correct steps to uninstall Windscribe as well as other unwanted apps from Mac computer. Does this removal guide help solve your uninstall issues? And which method do you think is more time-saving and hassle-free?
Any valuable suggestion or comment are welcomed to help improve this article.
 $29.95/lifetime