How Can I Properly Uninstall Eclipse for Mac
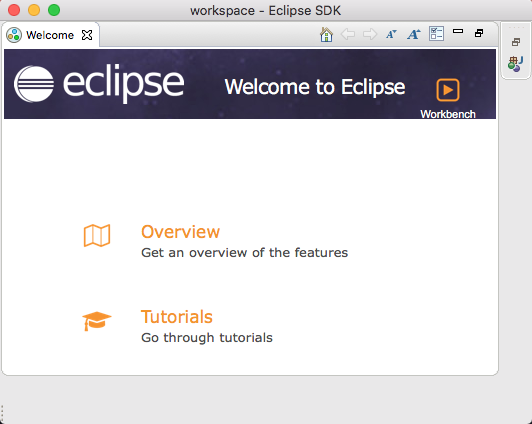
Eclipse is an integrated development environment written in Java and mostly used for developing Java applications. In this app users can write, compile and run their Java codes. But note that running Eclipse has some requirements about both hardware (Intel, 64-bit processor) and software (OS X 10.5 or later ). If it is not compatible with your Mac, you may need to give up and even uninstall Eclipse from your machine.
Having uninstalled Eclipse but it still shows up in Spotlight? Cannot figure out how to remove this app and all the files it created on your Mac? In this tutorial we will guide you through the proper steps to uninstall Eclipse, and moreover, provide a hassle-free, easy-to-complete solution to help you remove any unwanted Mac apps.
Uninstall Step 1. Quit Eclipse
Before you start to uninstall Eclipse, don’t forget to check if it has been stopped from running yet. If the app appears in the Dock, right click its icon in Dock and choose Quit. And click Exit button when prompted if you want to exit the Eclipse SDK.
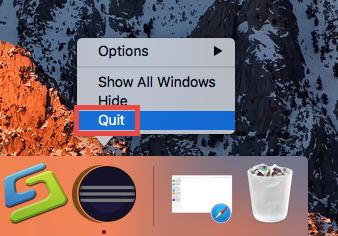

If Eclipse stops running, you can use Activity Monitor to kill the process:
- Open up Activity Monitor from Dock, via Launchpad or in Finder.
- Type the app name in the Search box, and select the process pertaining to the app.
- Click the X icon on the upper left corner, and click (Force) Quit in pop-up dialog.

After that, you can proceed to uninstall Eclipse, either manually or automatically.
Uninstall Step 2. Delete Eclipse
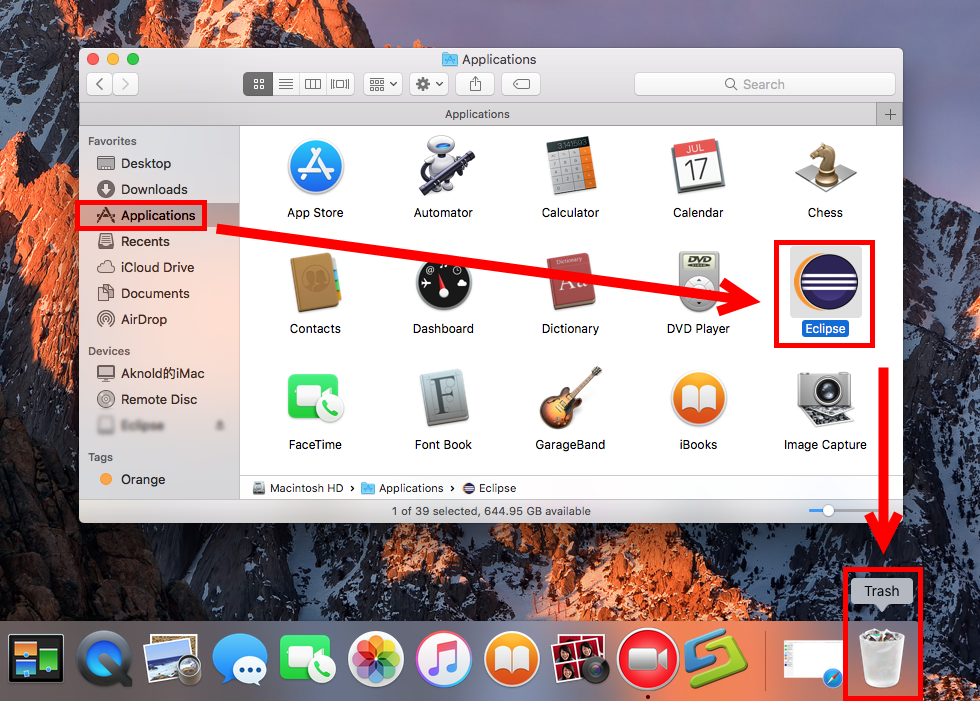
To get rid of Eclipse from your Mac can be very simple as you only need to delete it from the Applications directory. Here are the detailed instructions you could follow:
- Open up Finder, and head to the /Applications folder from the sidebar.
- Select Eclipse, drag its icon to the Trash in Dock, and drop it there.
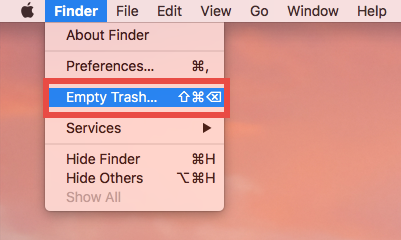
- Choose Finder from the menu bar, and choose Empty Trash option.
Eclipse does not offer a dedicated uninstall tool so you need to manually delete the Eclipse folder and also the .metadata folders in your workspace. For those apps that come with a built-in uninstall script, running the script could save some troubles. Additionally, apps installed through Mac App Store can be uninstalled via Launchpad.
There is an advanced option to uninstall Eclipse – using Terminal. You can run Terminal from Spotlight, type the two command in Terminal and hit Enter key:
sudo apt-get autoremove eclipse*
rm -r ~/.eclipse/
Since Eclipse has been removed from the Applications directory, it is time to check out if this app leaves behind some of its components in multiple system folders.
Uninstall Step 3. Remove Leftovers
Normally, Eclipse will install some other files which reside outside it’s directory on OSX, and they survive after you deleting Eclipse the app itself. How can you get rid of Eclipse completely? Here we share a trick to help you locate Eclipse-related items:
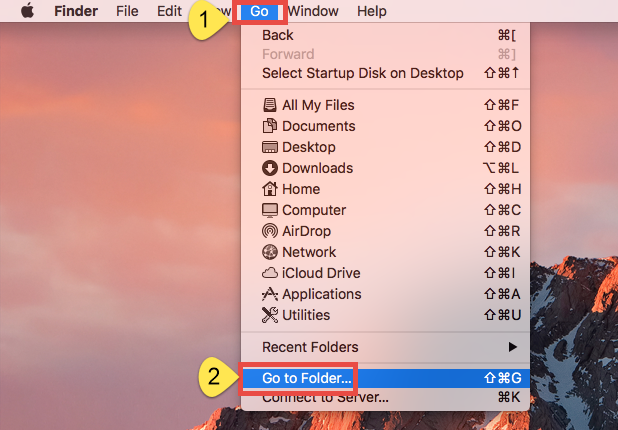
- Open the Finder, head to the Go menu in Menu Bar, and choose Go to Folder.
- Type ~/Library in the box that appears, and hit Enter key to open up the folder.

Search for the items whose names contain Eclipse (or LastPass) in the locations:
~/Library/Caches/, ~/Library/Preferences/, ~/Library/PreferencePanes/, ~/Library/ApplicationSupport/, ~/Library/LaunchAgents/, ~/Library/LaunchDaemons/, ~/Library/StartupItems/
Warning: Don’t rush to delete any file if you are not sure whether it belongs to Eclipse. Mistakenly deleting unrelated items could affect other apps or even the system. To locate Eclipse leftovers precisely, use the Search feature in Finder:
- In ~/Library, click Search in upper right corner, and type Eclipse in search bar.
- Select associated items under “This Mac” title, and move them to Trash.
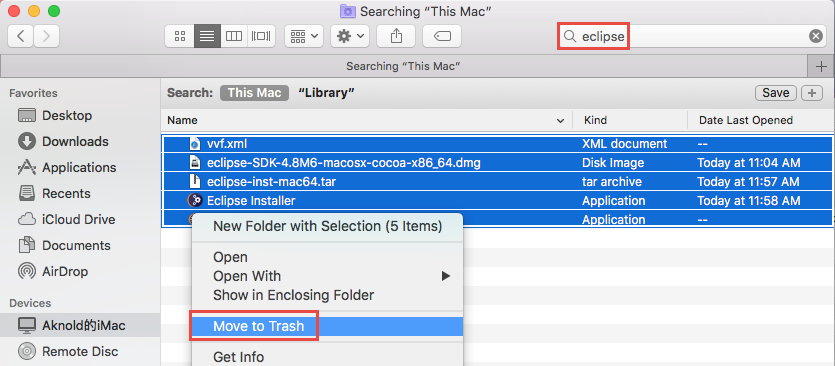
- Click “Library” under the bar to show the result in the specific folder.
- Select the matched items in the search result, and delete them to the Trash.
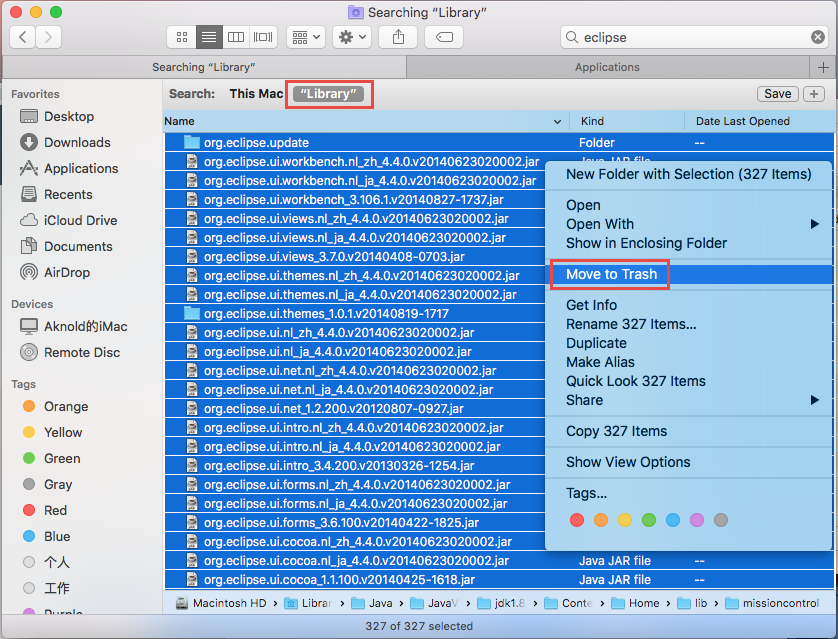
- After that, repeat the steps to delete Eclipse leftovers stored in Library folder.
- Finally, empty the Trash to permanently get rid of all Eclipse traces.
That’s how you can manually delete Eclipse and its remaining components from macOS/Mac OS X. Wanna avoid potential risk or laborious work? We prefer to adopt the more time-saving solution – removing Eclipse by utilizing Osx Uninstaller.
One-Stop Solution to Remove Eclipse (Osx Uninstaller)
Have no idea what Osx Uninstaller can do for you? In short, a handy, reliable tool could help you to delete all components of target app within a few seconds. If you encounter issues when trying to uninstall Eclipse, try if Osx Uninstaller could help.
This clip shows how Osx Uninstaller works to quickly remove Eclipse for Mac:
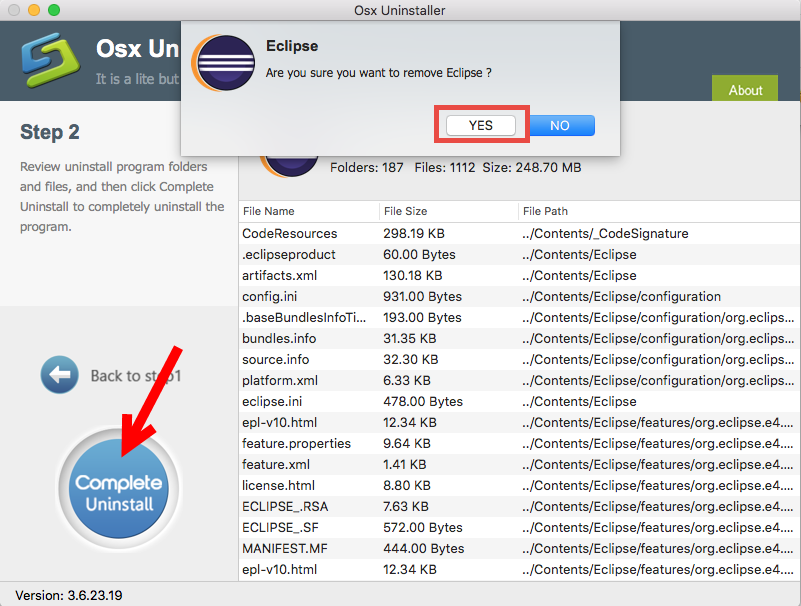
Follow the simple steps to thoroughly remove all traces of Eclipse from your Mac:
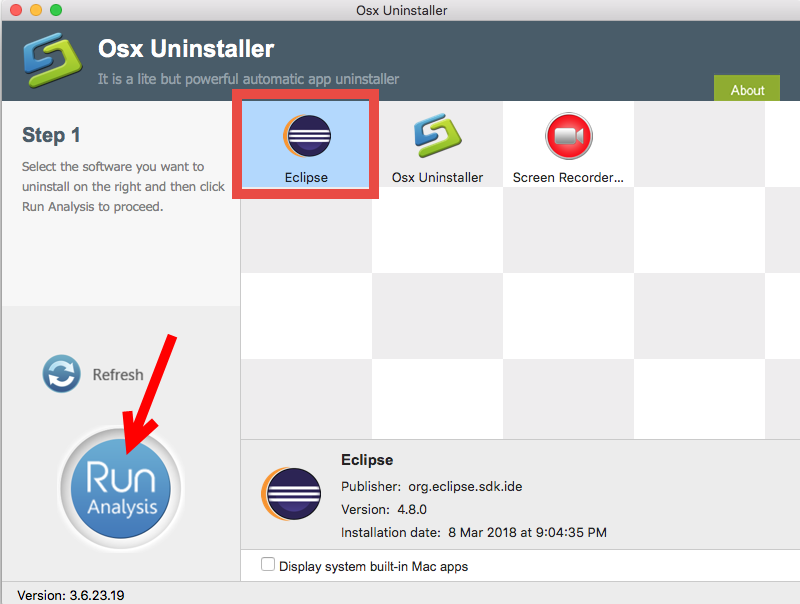
- Launch Osx Uninstaller, select Eclipse and click Run Analysis button.
- Click Complete Uninstall, and then click Yes to execute the uninstall.
- Click on Back to Interface button to re-scan currently installed apps.
Removing Eclipse by Osx Uninstaller is definitely more convenient and high-efficient, but note that Osx Uninstaller requires a valid license to perform the final uninstall.
To conclude, two different solutions are provided in this post to help you uninstall Eclipse, and the tricks discussed above are also applicable for removing most third party Mac apps. So, which method will you adopt to get rid unwanted Mac apps?
We would appreciate if you would leave your valuable feedback about this post.


 $29.95/lifetime