Impossible to Uninstall F-Secure Anti-Virus from Mac? Get Help Here!
“I thought that maybe I need to uninstall f-secure and reinstall it (or use other antivirus protections instead that I like better) but I don’t even manage to uninstall it!!”, “When I go to the Application to uninstall it says “uninstall failed!” If you like these users who have ever met problem with managing to uninstall F-Secure Anti-Virus for Mac, then read this article carefully for help!

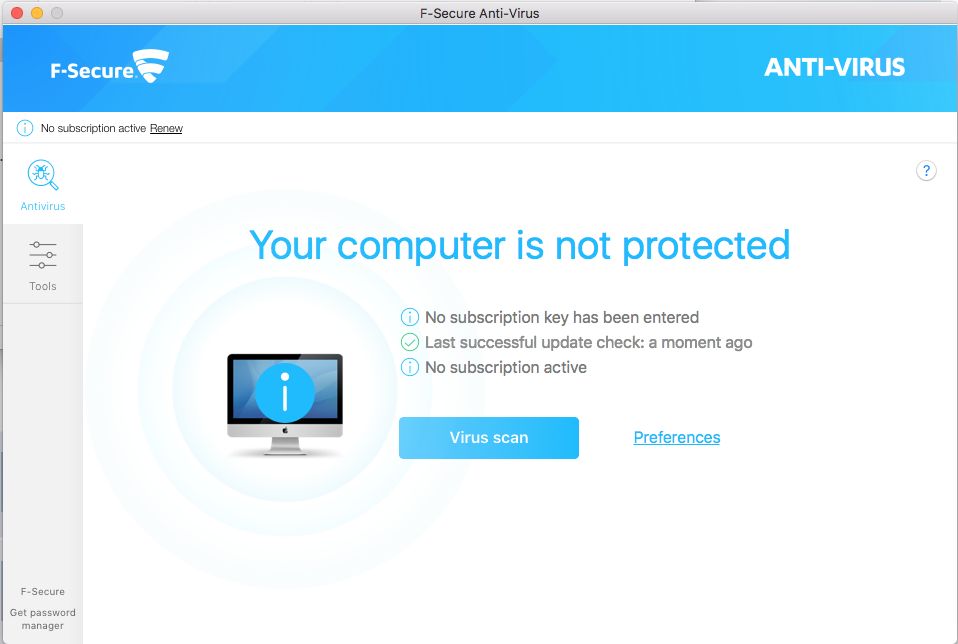
F-Secure Anti-Virus is an advanced detection and protection technology to protect your computer against modern and complex threats. F‑Secure Anti‑Virus provides protection against viruses, spyware, infected e-mail attachments and other malware. Therefore, this is a tutorial of eliminating F-Secure Anti-Virus for Mac from macOS system.
Usually, most people have to face the problems when try to uninstall F-Secure Anti-Virus from their computers but failed at the end:
- F-Secure Anti-Virus says “Uninstall failed”
- F-Secure Anti-Virus refuses to be removed from the Mac
- F-Secure files and data cannot cleaned thoroughly with the app removal
- Associated issues and problems appear after removing the application
- People can installed other antivirus apps because of the exist of F-Secure
Choose Different Options to Uninstall F-Secure Anti-Virus for Mac
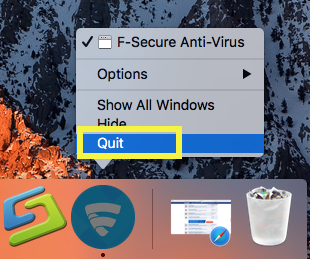
Exit the App from Running
In order to make sure everything goes smoothly in uninstalling F-Secure Anti-Virus for Mac, firstly quit the antivirus from running or working in the background before removal:
Option 1: Right click the target icon on Dock, and then choose Quit option;
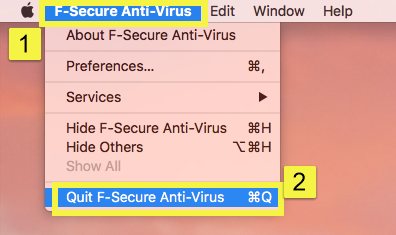
Option 2: Right click F-Secure Anti-Virus on the top left corner near Apple icon, then choose Quit F-Secure Anti-Virus (Command + Q);
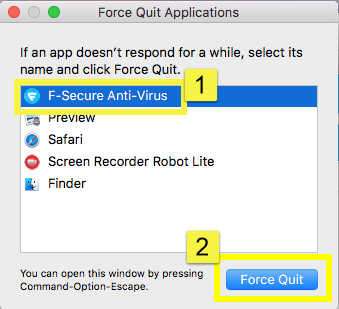
Option 3: Or press keyboard shortcuts with Command-Option-Esc to launch Force Quit Application window, then choose F-Secure Anti-Virus and click “Force Quit;
Use Terminal to Remove F-Secure Anti-Virus for Mac (Manual)
To remove F-Secure Anti-Virus from your Mac, you need to:
1. Open the command prompt:
- Open the Applications folder.
- Open the Utilities folder.
- Double-click Terminal.
2. Use the command line to run the following commands:
- rm -r “/Applications/F-Secure anti-virus.app” (This removes the application.)
- rm -r “~/Library/Application Support/F-Secure/Pwmgr” (This removes the local storage.)
You have now removed F-Secure Anti-Virus from your Mac computer.
Use Build-in Uninstaller to remove F-Secure Anti-Virus
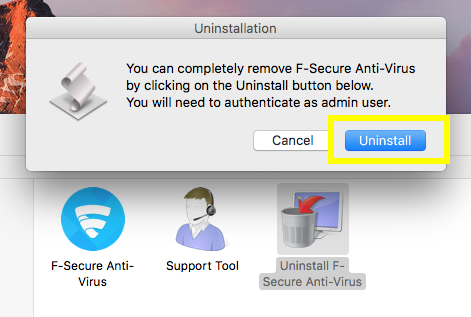
In this part, find the build-in uninstaller to truly get rid of F-Secure Anti-Virus as bellow:
- Open Folder >> Click Application >> Click F-Secure folder >> Launch Uninstaller F-Secure Anti-Virus,

- Allow the uninstall process to run by clicking “Uninstall“;
Use Trash to Uninstall F-Secure Anti-Virus from Mac (Manual)
In this part, user will take use of Trash and Library folder to uninstall F-Secure Anti-Virus from Mac computer, you’d better follow the step by step to handle the removal of F-Secure.
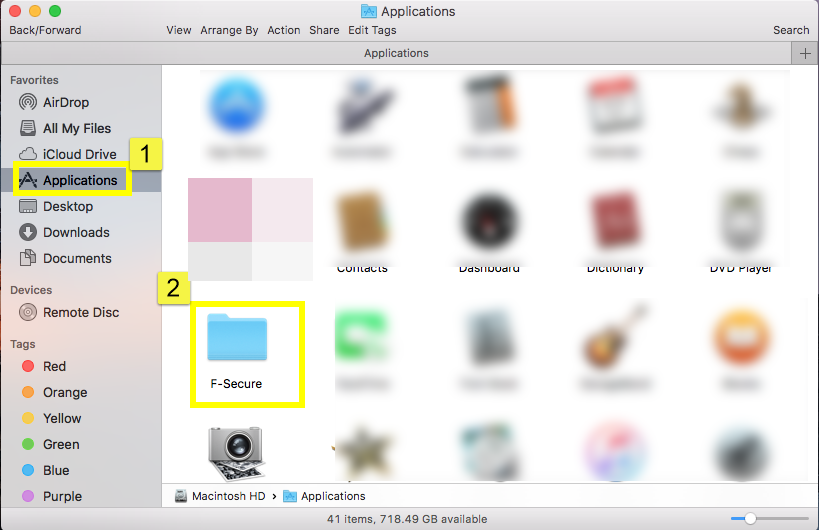
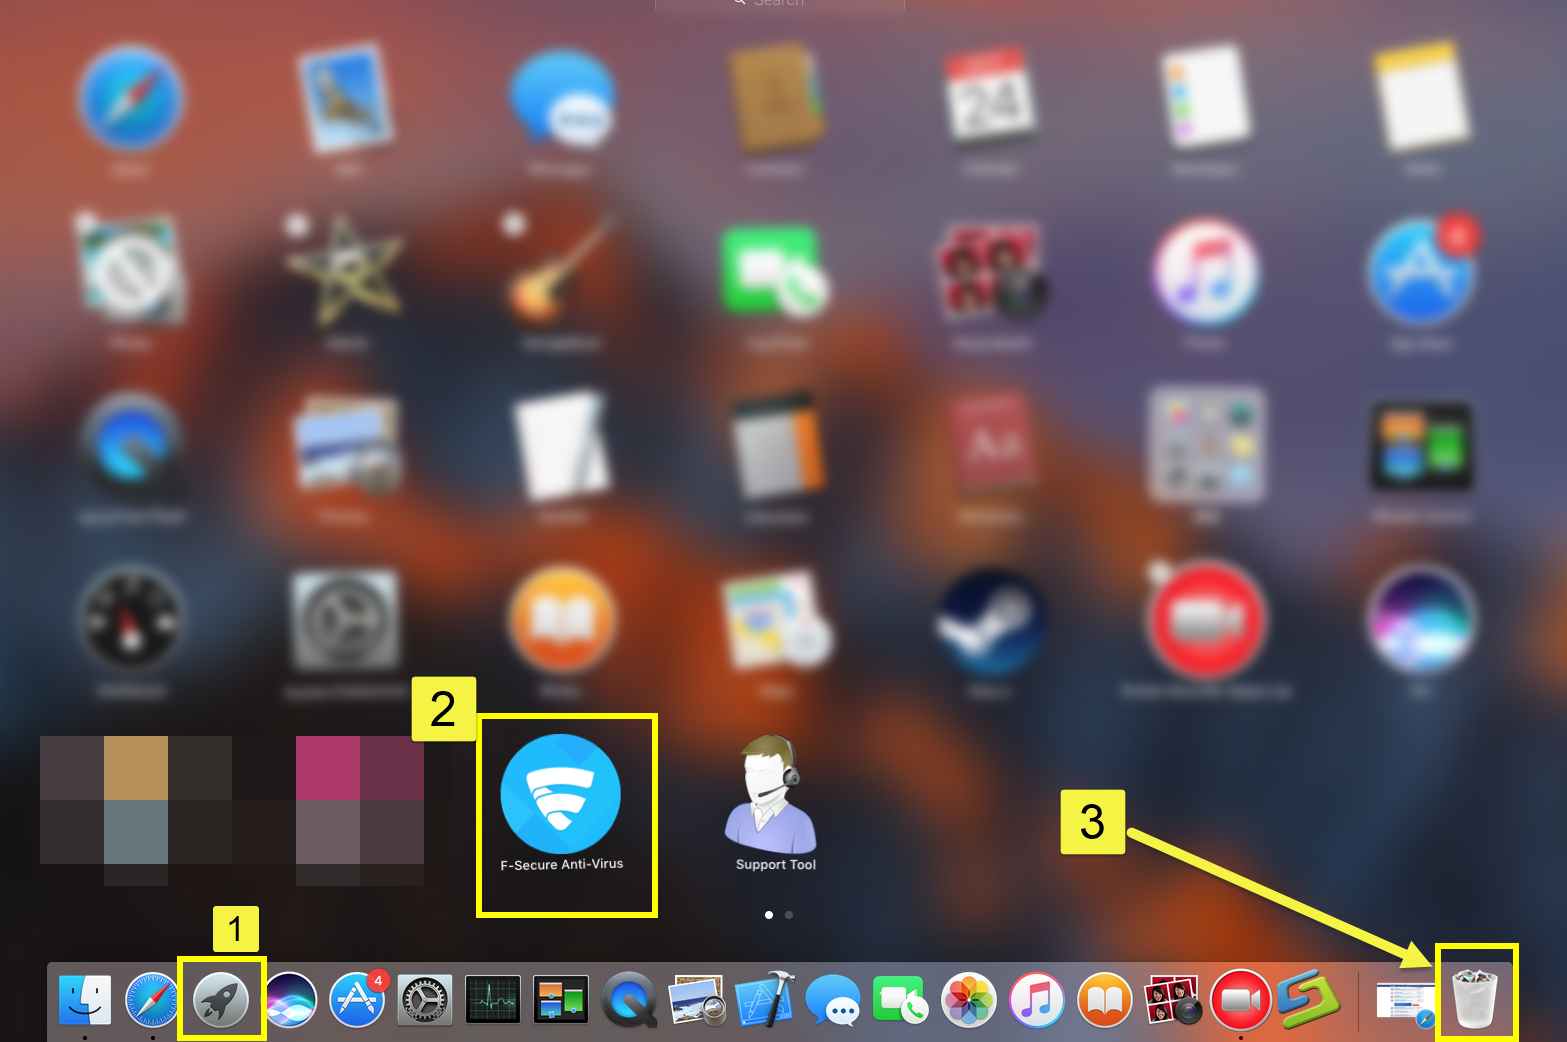
1. Open Finder >>Click Applications on the left >> Open the F-Secure folder >>Drag F-Secure Anti-Virus into Trash by sliding, or right click to choose Move to Trash;
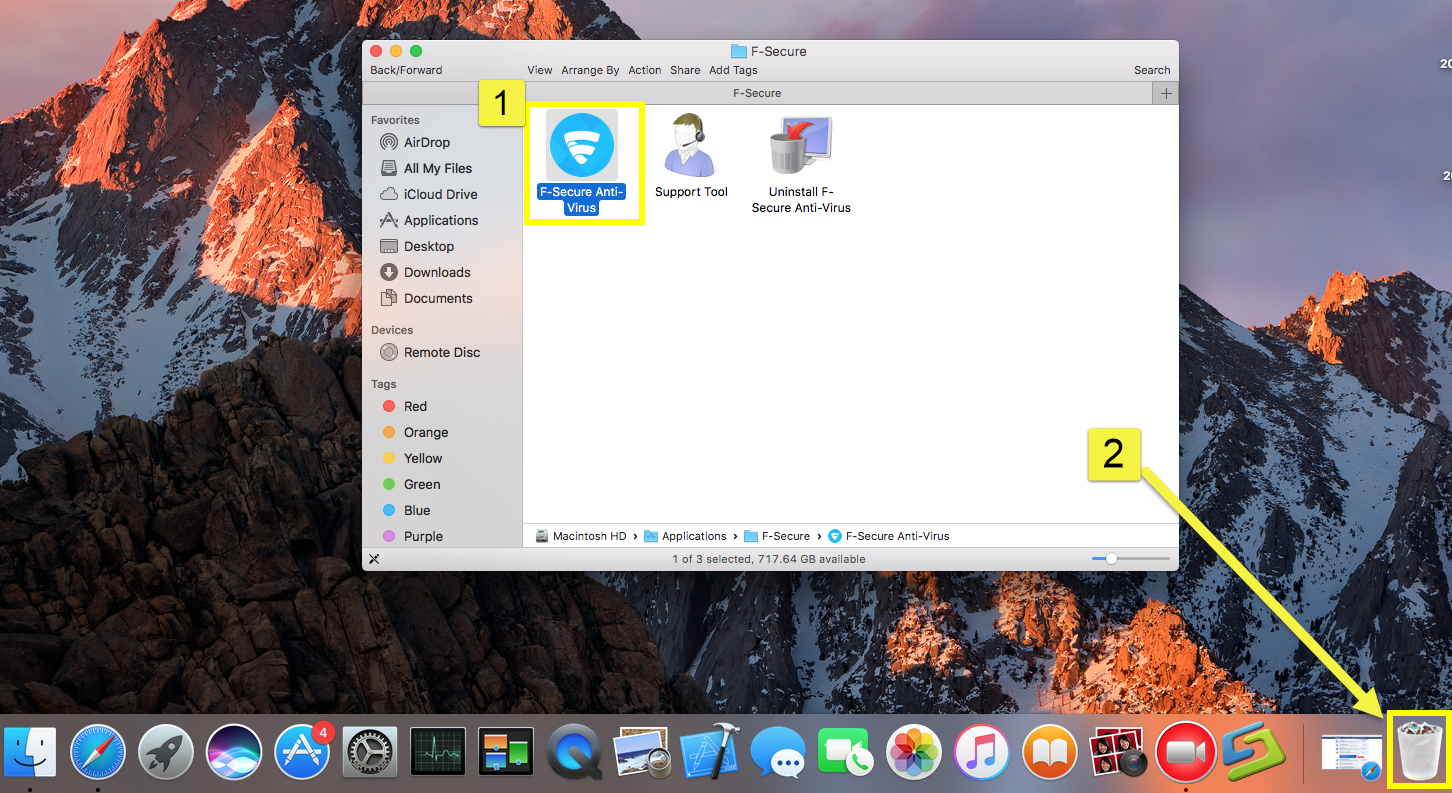
2. Open Launchpad, click icon and hold in a while until it starts to wiggle>>That the “X” that appears on the left upper corner >> Straightly drag it into Trash.
These are the most basic operations to uninstall F-Secure Anti-Virus in macOS, however, it becomes much more difficult in next part to eliminate all its leftovers.
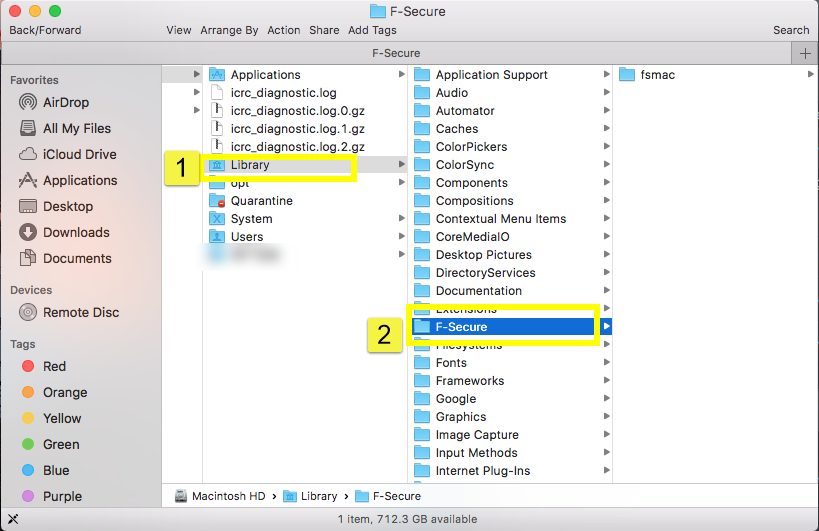
To do so, you need to:
- Open “Finder”
- Go to Menu Bar, and select Go > Go to Folder…

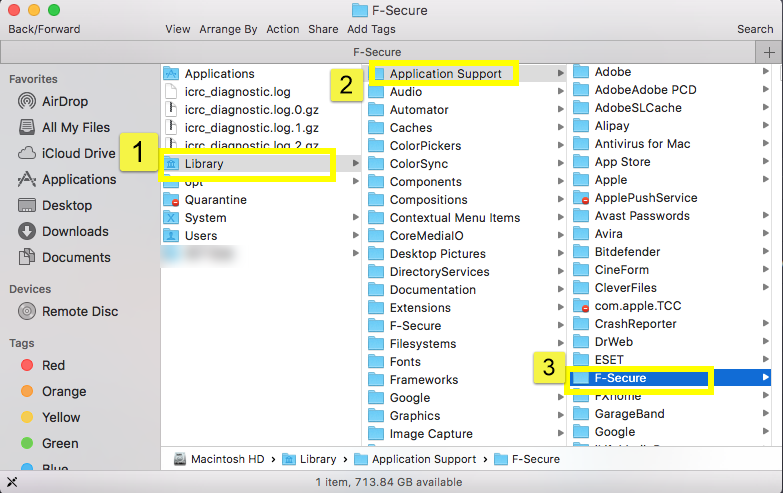
- Type “~/library/” in the box, hit Go
- Type the name of F-Secure Anti-Virus/F-Secure in the search box of ~/Library
- Right click to delete all the select targets then.
- Or search the files in the name of F-Secure/ F-Secure Anti-Virus in the most usual folders like Application Support,
- Caches

- and Preference
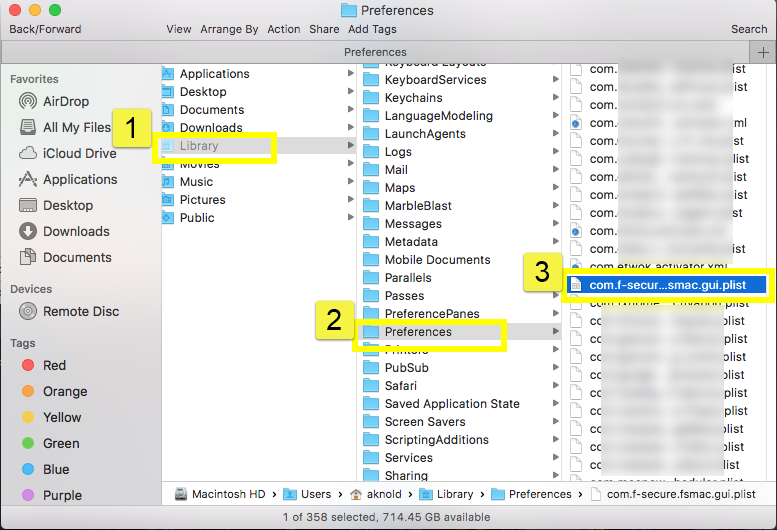
- Once they showed right-click to delete all of them
- Finally, right-click Trash, choose Empty the Trash to confirm your whole removal.
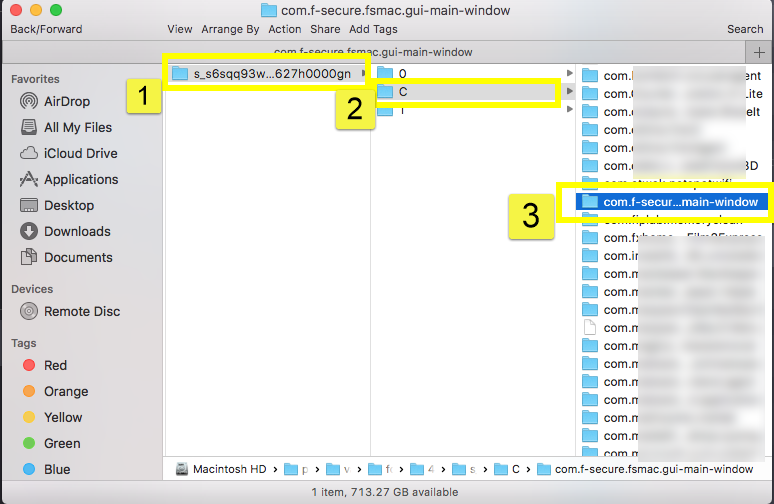
Be careful, some other files might be hided in these folders: ~/Libary/F-Secure:
or ~/Libary/C:
Use Removal Tool to completely Uninstall F-Secure Anti-Virus for Mac (Automatic)
Last but not least, there is a much easier and faster way to safely &thoroughly uninstall F-Secure Anti-Virus from Mac computer, take a few minutes to learn its working process:
(Download Osx Uninstaller from the former button and register from the website successfully)
Spend a few minutes to watch the Video Tutorial of F-Secure Anti-Virus removal with OU:
Step 1: Run Analyze on the target.
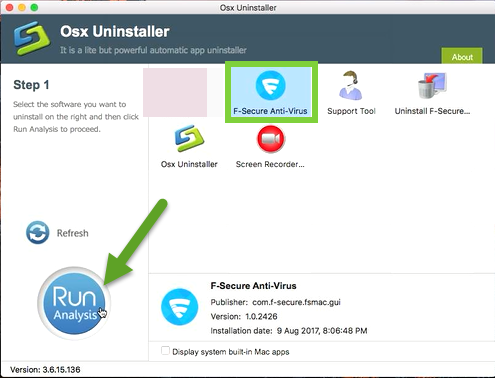
Run the uninstaller, and select the F-Secure Anti-Virus icon in the interface then click button Run Analyze;
Step 2: Complete Uninstall F-Secure Anti-Virus
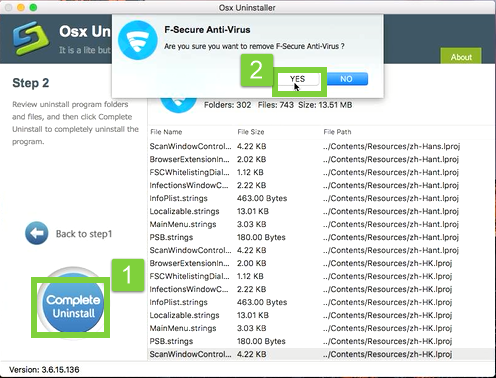
Easily click on button Complete Uninstall to conduct the regular removal. Then click Yes to delete all leftovers scanned;
Step 3: Successfully removed
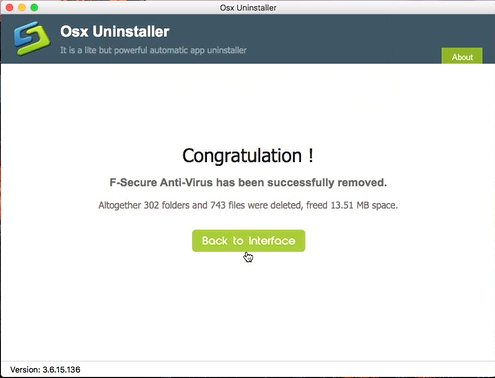
Congratulations, you have just removed F-Secure Anti-Virus successfully as fast as you think.
Conclusion: Now you should know how to correctly uninstall F-Secure Anti-Virus from your Mac, Manual or Auto? That’s a question. Hope you never met problem like “Uninstall failed” of any unwanted programs removal in the daily life.
 $29.95/lifetime