How Can I Completely Uninstall Xcode from Mac
Get info about uninstalling Xcode
Xcode is an integrated development environment designed by Apple to provide everything developers need to create apps for Mac, iPhone, iWatch and iPad. This suite integrates application UI design with interface builder, code editing, debugging, and testing. The new released version includes the Xcode IDE, Swift 2 compiler, Instruments, Simulator, and latest SDKs for OS X, iOS, tvOS and watchOS.
But what if you want to remove Xcode? Is is the same easy as you get it from the App Store? Unlike general Mac apps, Xcode takes more patience and techniques to be removed totally from OS X. If you have used Xcode for a long time, it was likely to generate a large number of files that take quite a bit of disk space. Simply dragging Xcode to the Trash seems to delete the app files from sight but may not be able to remove the huge number of files pertaining to Xcode and the devtools, and those files may weigh around several Gigabytes. People try to uninstall Xcode for personal reasons, but for those who intend not to use Xcode any more, it is highly recommended to perform a clean uninstall. How to uninstall Xcode and delete all its remaninings properly? Read this tutorial to learn some tricks about Mac app removal.
Manual Instructions to Fully Uninstall Xcode
First of all we would like to introduce the standard method of uninstalling Mac apps. Please follow the step by step instruction below to avoid possible error & ensure complete removal. If you are desired to uninstall Xcode as simple & swift as possible, just scroll down to this part: Remove Xcode with Osx Uninstaller (Recommended).
1. Quit Xcode-related processes
Before uninstalling Xcode, you’d better quit this app and terminate related processes.
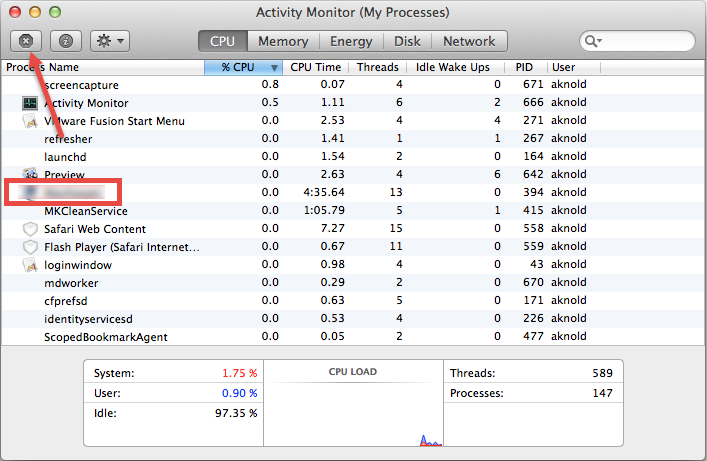
- Locate the Utilities folder in launchpad, and click Activity Monitor from this folder.
- Select Xcode process and click Quit Process icon in the left corner of the window.
- Click Quit in the pop-up dialog box (if that doesn’t work, then try Force Quit).
2. Delete Xcode Application to the Trash
Make sure that you have logged into your Mac with an administrator account, and you may be asked for a password when you try to delete something in the Finder.
(1) Standard method of uninstalling Mac apps:
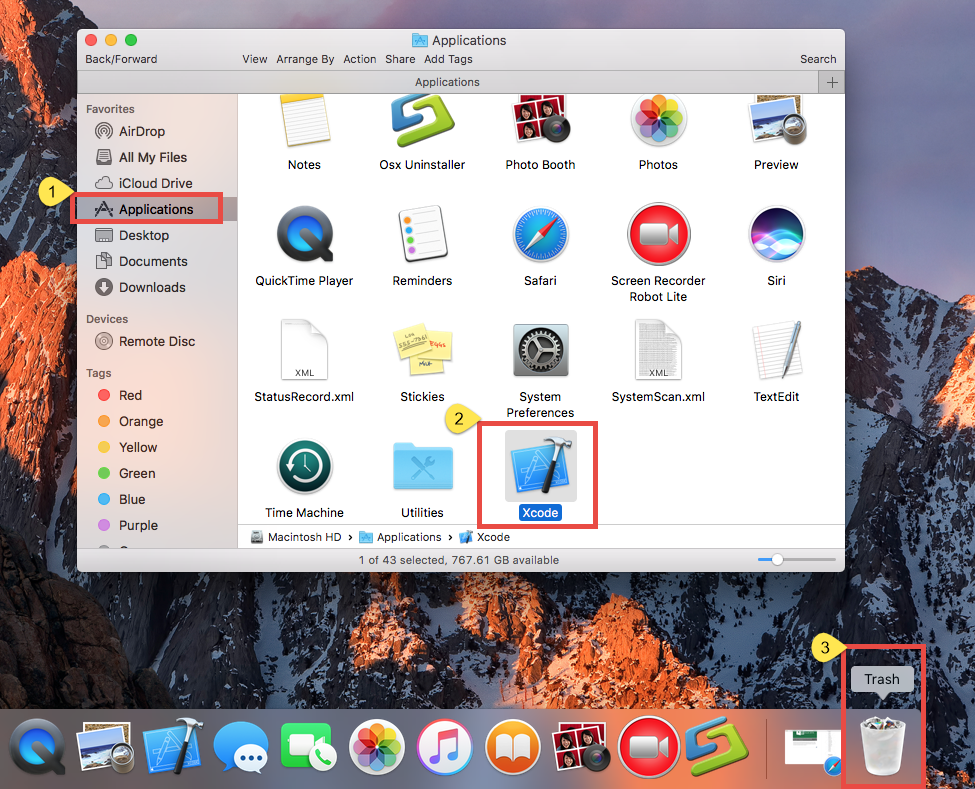
- Open the Finder and head to the Applications folder on the left panel.
- Drag Xcode icon to the Trash in the dock (or click it and press Cmd + Del keys).
(2) Alternative option ( apps installed from App Store):
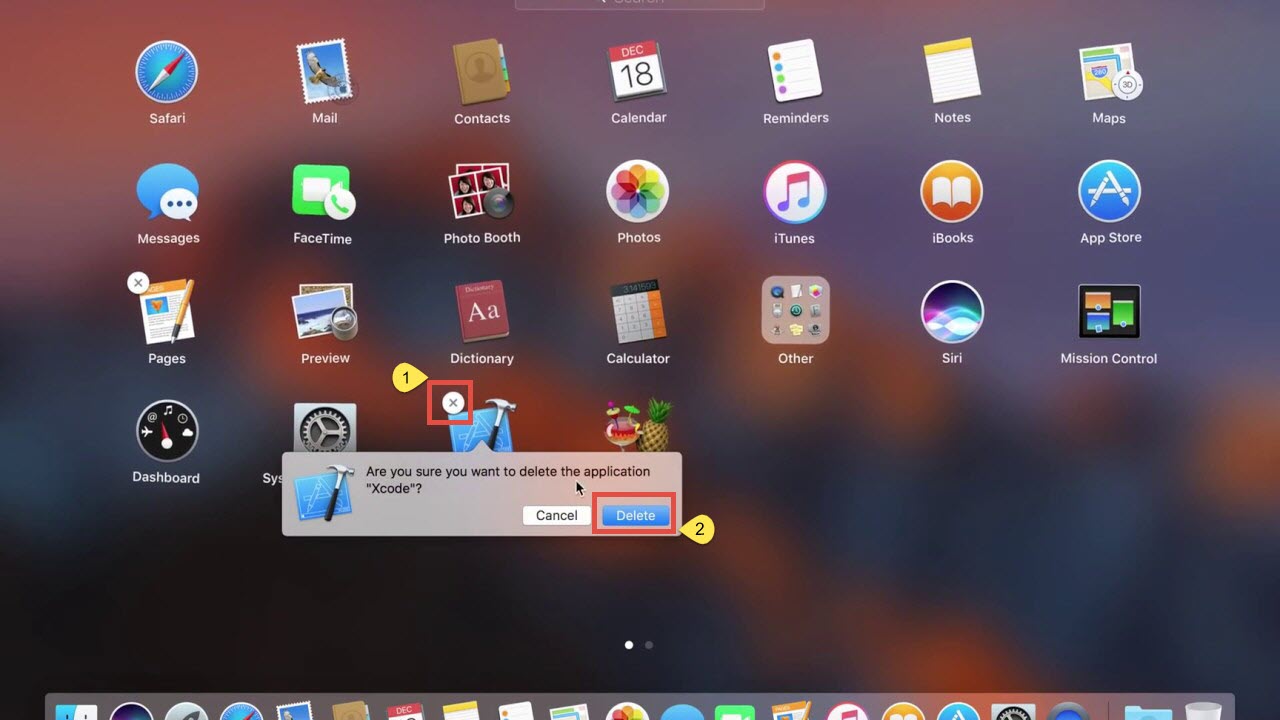
- Open Launchpad, and type Xcode in the search box at the top.
- Hold on Xcode icon until the icon begins to wiggle and shows the “X” .
- Tap the “X” in the left top corner to remove Xcode.
If it is the previous version of Xcode you run on your Mac, the Install Xcode app downloaded from App Store may stay in the Applications folder after Xcode has been uninstalled. Don’t forget to delete this app to restore more than 1 GB of disk space.
(3) Additional way (through Terminal command line):
Some users may try running the uninstall command line in the Terminal to remove Xcode, but is it safe to do so? Running the following command will remove everything pertaining to Xcode from your Mac, and this way is risk-taking for Mac novices to take. Anyway, we list the steps here for your reference.
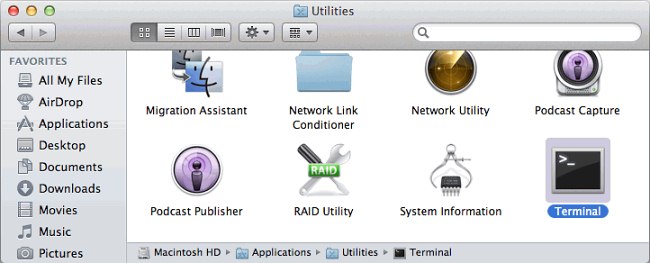
- Launch the Terminal (inside Applications/Utilities) and type the following:
sudo /Developer/Library/uninstall-devtools –mode=all - Confirm the admin password (required for sudo) and let the scripts run.
3. Sweep out Xcode Traces in Finder
As is mentioned before, it is the files Xcode creates and stores throughout the system that makes Xcode difficult to be uninstalled entirely. You can detect and clean out the remainings, most of which are stored at the Develop folder, by doing these:
- Open the Finder, click the “Go” from the Menu Bar, select the entry:|Go to Folder… in the list and then enter the path of the Application Support folder: ~/Library

- Search any files or folders containing the name of Xcode in the following locations:
~/Library/Developer/,
~/Library/Preferences/,
~/Library/Application Support/
~/Library/Caches/ folders
- Right click on those matched items and click Move to Trash to delete them.
- Meanwhile, search the following locations to identify and delete associated items:
/Library/Developer/
/Library/Preferences/
/Library/Application Support/
/Library/Caches/
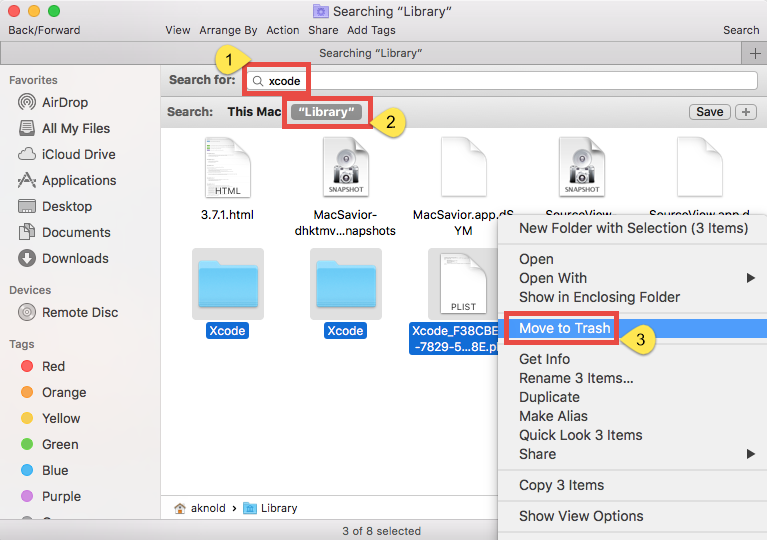
If there is still some hidden files you fail to find out, do a Google search about the location of Xcode components. Usually the app kernel extensions are located in /System/Library/Extensions and end with the extension.kext. Otherwise you can use Terminal to list the contents of the directory in question and delete the offending item.
4. Empty the Trash to Permanently Remove Xcode
If you are determined to delete Xcode permanently, the last thing you need to do is to empty the Trash. Notice: the act of emptying the Trash is irrevocable, and everything in the Trash will be deleted immediately, so make sure you haven’t mistakenly delete anything before emptying the Trash.
- Right click on the Trash icon in the dock.
- Choose Empty Trash and click OK in the pop-up dialog.

- Alternatively, you can empty the Trash by choosing the Empty Trash under the Finder menu. In case you cannot empty the Trash, reboot your Mac and do it again.
- If you change your mind about deleting the item before you choose Empty Trash, you can right click on the items in the Trash and choose Put Back option.
That’s the end. Now you should have successfully removed Xcode as well as its associated files to make more disk space available. Wait. Still have problems?
Remove Xcode with Osx Uninstaller (Recommended)
If you run into any trouble when trying to uninstall Xcode, or you just wanna uninstall it in a much more convenient & timesaving way, why not utilize a professional uninstaller to resolve these worries? Osx Uninstaller is an efficient & safe utility that enables you to remove unwanted, problematic or incompatible apps thoroughly & effortlessly. With it in hand you can easily get rid of Xcode in less than 1 minute.
1. Download Osx Uninstaller and install it by dragging it to the Application folder.

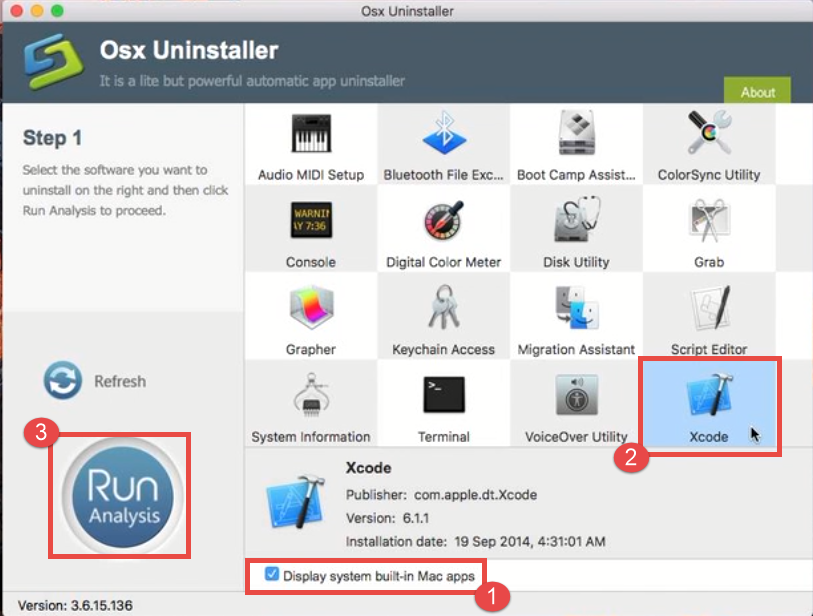
2. Launch Osx Uninstaller, click the box Display System Built-in Mac Apps, then select Xcode, and tap Run Analysis button to start scanning all its components on your Mac.
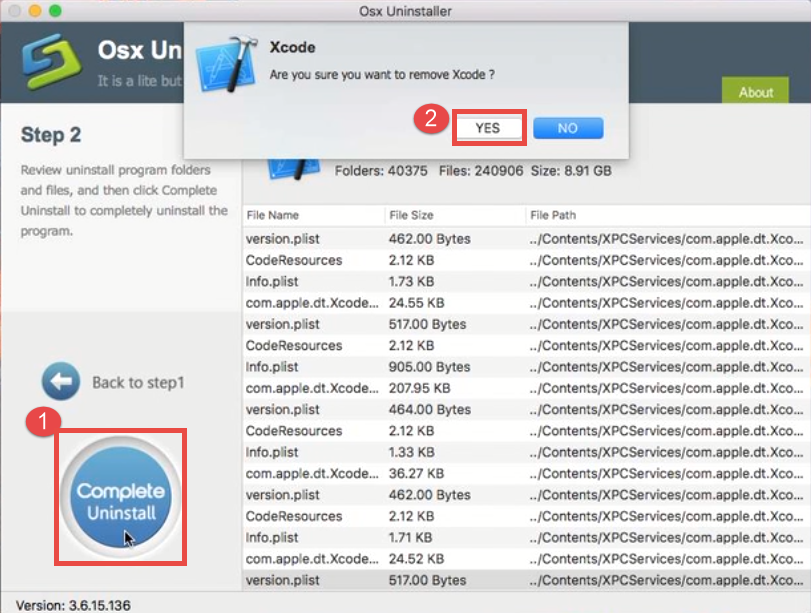
3. Review the files and folders pertaining to Xcode, click Complete Uninstall and then click Yes in the pop-up dialog box to accomplish Xcode removal.
4. Click Back to Interface button to re-scan the apps installed on your Mac.
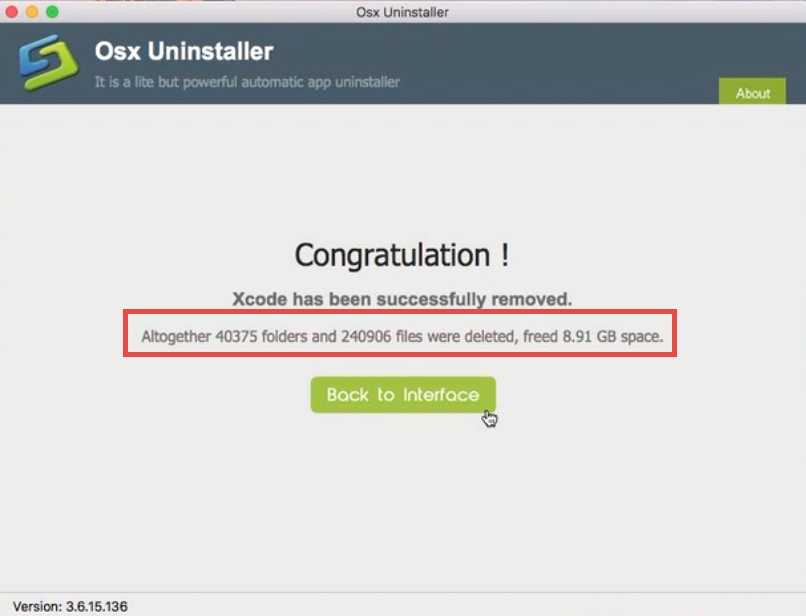
The whole removal process may take a few seconds to finish, and then the Xcode app as well as its belonging items will be successfully removed from your Mac!
This article lists two effective approaches to uninstall Xcode, and you can choose either of them as you like. As a reliable, advanced & easy-to-use app, Osx Uninstaller can promptly scan out and then thoroughly wipe out all the traces of target software without any hassle. A handy and timesaving tool. If you encounter any problem in any Mac app removal, try this automated tool to resolve your troubles right now!


 $29.95/lifetime