How to Uninstall Mullvad VPN for macOS?
Gain the ability to uninstall Mullvad VPN for your Mac by walking through this guide! Get answers from an experienced IT expert to all your questions regarding how to uninstall Mullvad VPN or other unwanted Mac apps with ease. If you are like me, you stay here and want to read more now because you wonder to know for sure whether the methods introduced here are helpful to totally uninstall an app for your Mac. Don’t be hesitated, you can figure it out here.
Mullvad VPN Overview
Mullvad VPN is an excellent virtual private network app that can be used to stay anonymous online no matter when you are surging, chatting, watching or something else. Mullvad VPN brings out effective ways to protect yourself from being the victim of identity theft, keeps you anonymous online to protect your privacy and helps you take advantage of proxy server to bypass any restriction to access browser websites, download contents, and more.

Mullvad VPN claims it is able to help any users evade hackers and trackers. Once the Mullvad VPN is connected on your Mac, all you traffic and privacy will be encrypted to the highest standards, even if you are working with a public WIFI network. When you are shopping online, any others hardly could know your real IP address and all the payments are finished anonymously. Along with that, Mullvad VPN is an easy-to-use VPN solution that won’t need you configure much more information or multi-step registration process. Hence, if you are thinking these is an easy way to protect your self while surfing online, now staying anonymous with an optimal VPN app is getting popular, like Mullvad VPN, IVPN, ProtonVPN, ExpressVPN, NordVPN and more.
Figure out the Methods to Uninstall Mullvad VPN for Mac
Do you want to know how to uninstall or remove Mullvad VPN on a Mac? Do you want to master the hands-on skills to clean out some unwanted apps for Mac easily? How would you feel if you could take advantage of a professional way to completely get rid of all vestiges of Mullvad VPN without any hassle? You can begin this guide with any level of Mac knowledge. Let’s make it certain what the two methods are all about, and step-by-step guide included.
First Method – Remove Mullvad VPN In the Manual Way
We will get to know how you can manually uninstall Mullvad VPN on a Mac. We’ll utilize Finder mostly to step by step delete the Mullvad VPN.
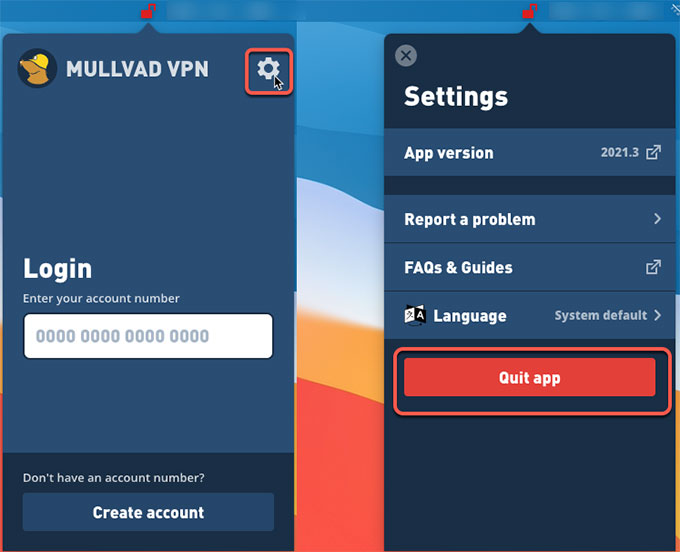
Step 1: If the Mullvad VPN now is working on your Mac, you need to quit itand stop all associated activities running in the background. To do this, you can optionally right-click the Mullvad VPN icon at the top-right corner of the desktop screen > click Settings icon > click Quit app.
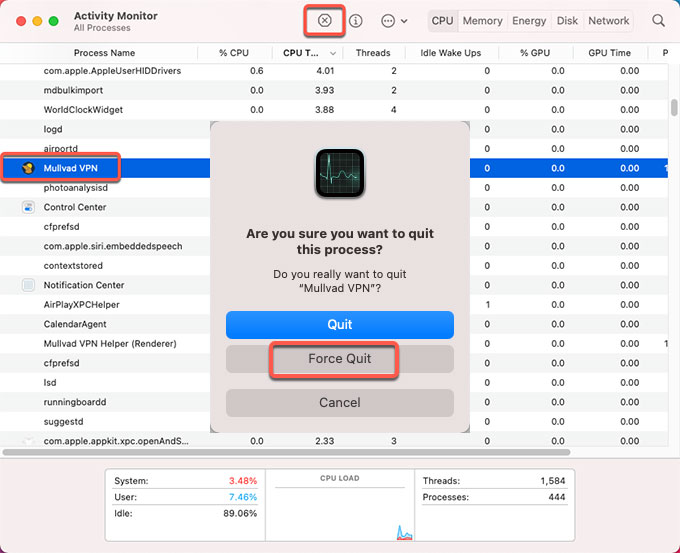
Step 2: Or you can close all things relevant with the Mullvad VPN from Activity Monitor. Click Finder > click Applications folder > click Utilities > select the Mullvad VPN app in the CPU tab > Click X icon > click Quit or Force Quit to close all processes with Mullvad VPN.
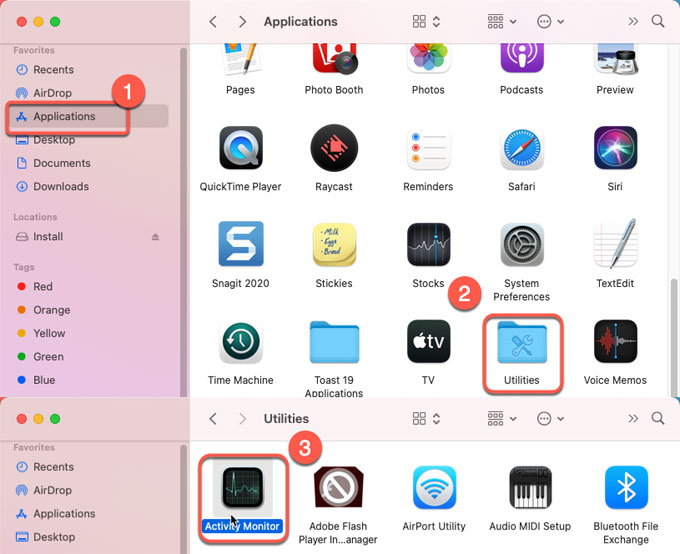
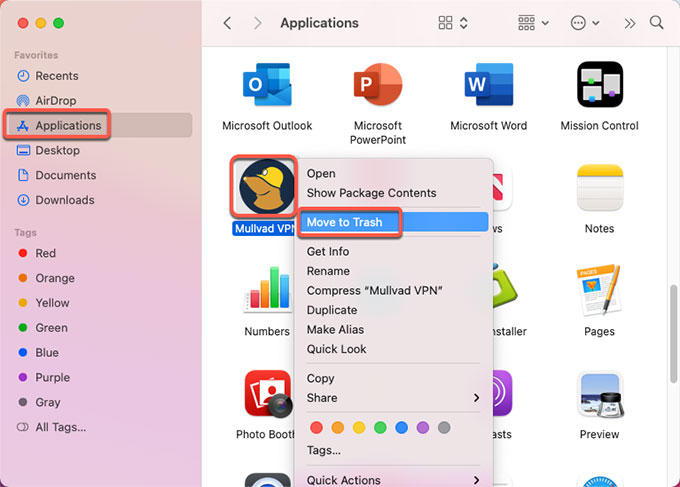
Step 3: It is the time to delete the Mullvad VPN app to theTrash. Click Finder > click Applications > right-click on Mullvad VPN app icon > select Move to Trash from the menu options.
Step 4: Along with the steps mentioned above, you still need to manually delete the left files for a depth cleaning of the Mullvad VPN app. Click Finder > click Go > click Go to Folder > enter ‘~Library‘ in the box > click Go or press Enter.
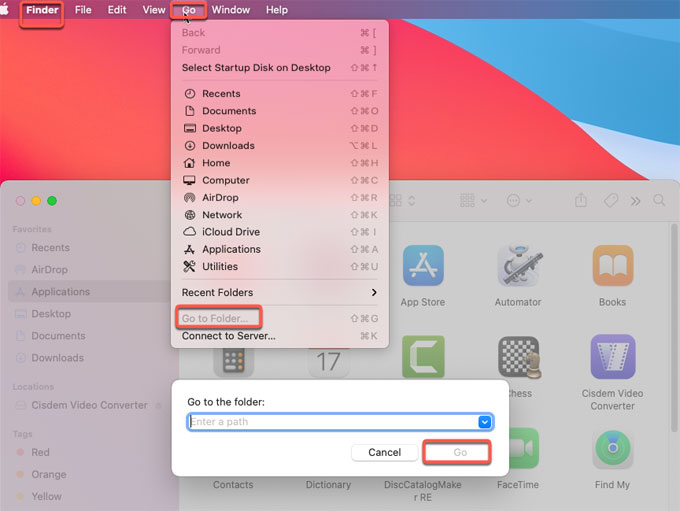
Step 5: Navigate to the following sub-folders, find out and delete all files associated with the Mullvad VPN app. You should be assure about each deletion of the Mullvad VPN files, any wrong deletion of system files probably will bring out more troubles to you. If you are not confident in deleting Mullvad VPN left files through your own hands, we suggest you give the second method a try. Maybe you will like it.
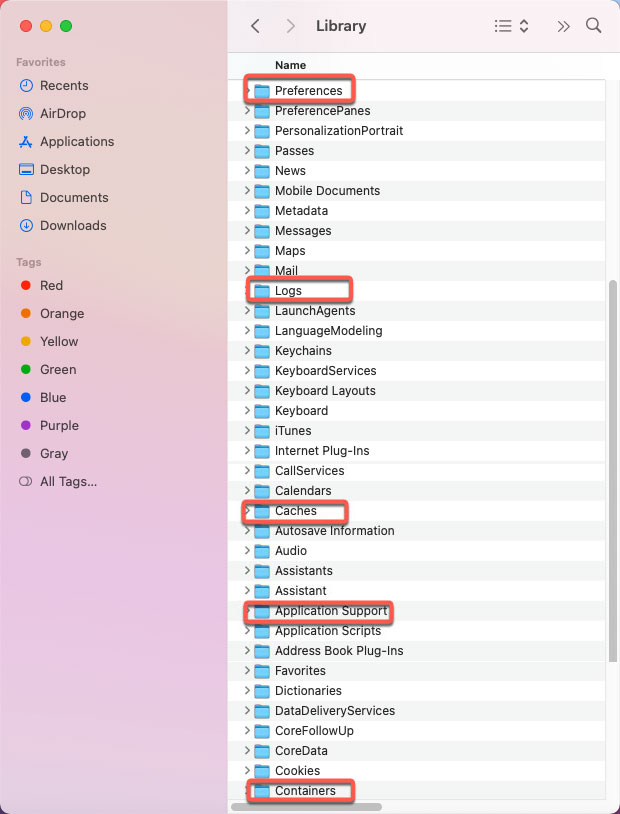
- ~/Library/Application Support/
- ~/Library/Caches/
- /Home/Library/Preferences/
- /Home/Library/Applications Support/
- /Library/StartupItems/
- /Home/Library/StartupItems/
- /Library/LaunchAgents/
- /Library/LaunchDaemons/
- /Home/Library/LaunchAgents/
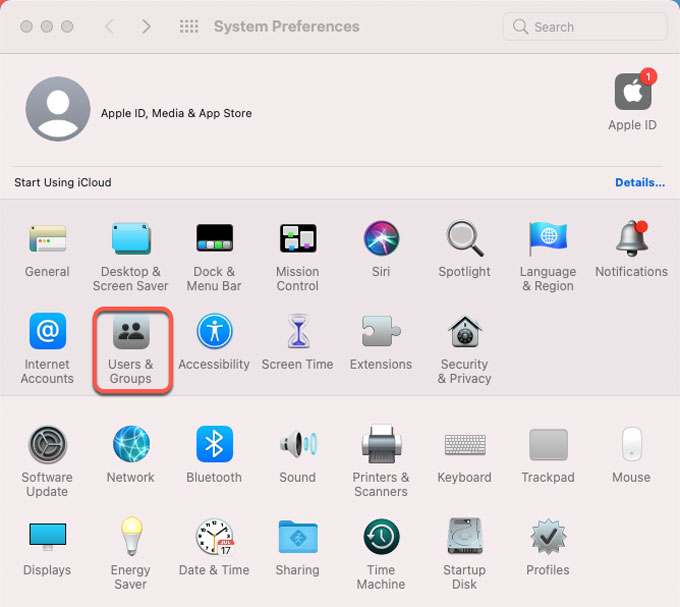
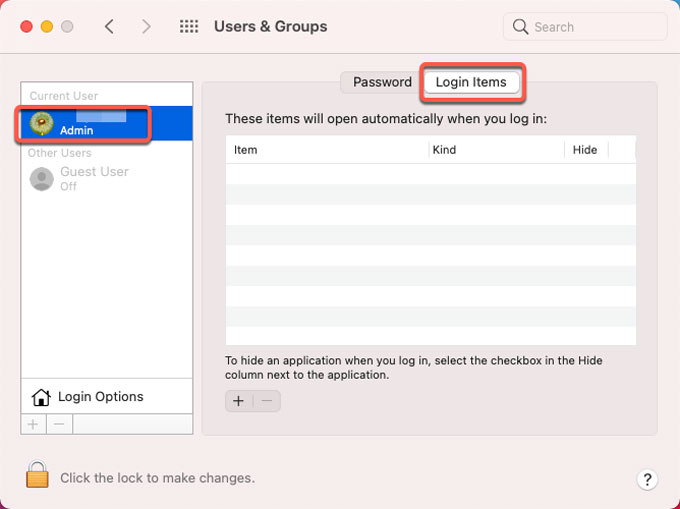
Step 6: To confirm that Mullvad VPN has been removed from the Login Items, you can click Apple menu > click Preferences… > click Users & groups > click your username > click Login Items. If the Mullvad VPN app is still listed under the Login Items tab, check it under the Hide pane > click “–” icon to delete it there.
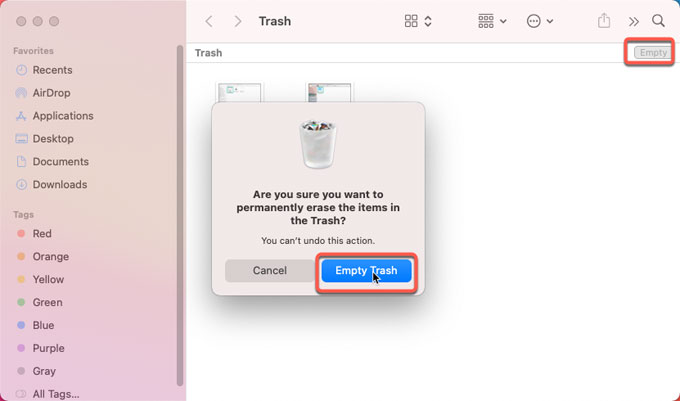
Step 7: Open Trash folder and Empty the items related with the Mullvad VPN. Restart your Mac.
Second Method – Uninstall Mullvad VPN by Osx Uninstaller
We will get to know how to use the provided Osx Uninstaller app to uninstall Mullvad VPN for your Mac. Osx Uninstaller is an optimal uninstaller software that can help you remove any Mac applications through just a few of clicks. If you are interested in knowing more about it, refer to the simple steps as:
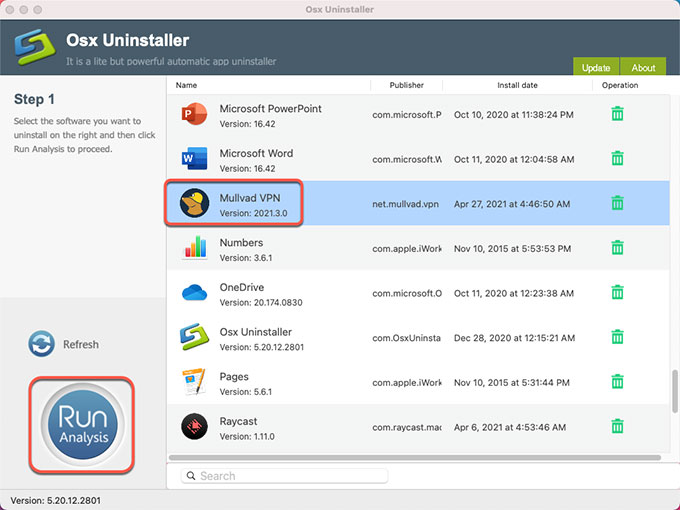
Step 1: Launch Osx Uninstaller app >scroll down to select the Mullvad VPN app on the Step 1 page > click Run Analysis. If you want to quickly find out the app that you want to uninstall, the Search box listed at the bottom of the Step 1 page will give you a quick access.
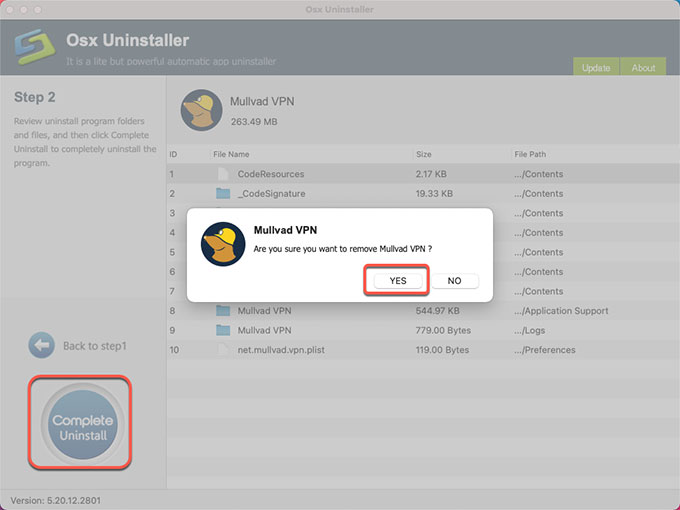
Step 2: Click Complete Uninstall > click Yes to confirm that you are willing to uninstall Mullvad VPN app for your Mac right now.
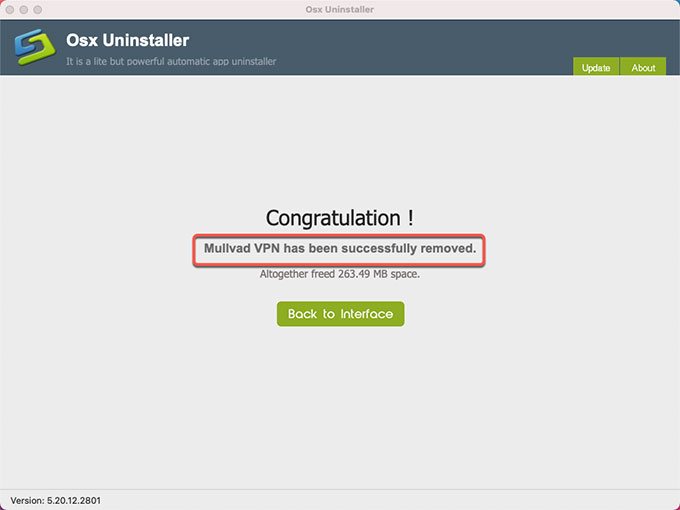
Step 3:When the uninstall process is finished, you’ll get a message like Mullvad VPN has been successfully removed. Click Back to Interface, now the Mullvad VPN app is removed. Restart your Mac.
Refer to ‘how to uninstall Mullvad VPN’ video guide:
Conclusion
At the end of this post, you must have clearly known what the two methods are and how they can be used to uninstall Mullvad VPN or other Mac apps. You will be able to confidently discuss uninstalling apps; and be able to manually remove any app if needed. You will also be effortless when you choose a professional uninstaller tool like Osx Uninstaller to uninstall apps. The ideal user for this Osx Uninstaller is someone looking to remove apps without hassles, someone looking to save much time and power while uninstalling any unwanted apps for Mac in seconds, or someone looking to use an easier and safer method to remove Mac apps thoroughly.
Do you want to try the provided Osx Uninstaller right now? Click the button below to obtain the app in no time.


 $29.95/lifetime